PBX-RF
From PROBOTIX :: wiki
Model: PBX-RF
Breakout Board Specs:
- DB25 Female
- All Pins Brought Out
- Jumper Enabled Input Pull-up Resistors
- Integrated 5V Logic Supply Regulator
- PBX-Hheader & Screw Clamp Terminals
- USB Powered Logic Supply for PC Side
Description:
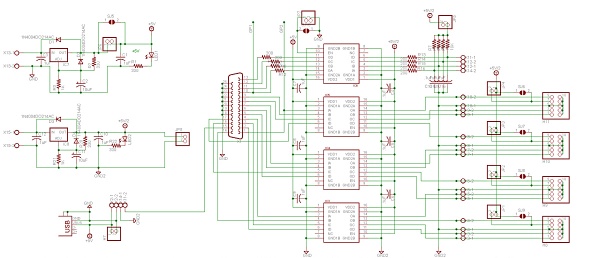
The PBX-RF is an Isolated Parallel Port Breakout Board designed specifically for Hobby CNC machines. It is compatible with a variety of Parallel Port CNC Control Software. The isolation layer protects the PC from potential damage from spikes or short circuits on the high voltage motor drivers used in CNC.
The RF isolation chips used in the PBX-RF work much like opto-isolators, except that they use radio waves to send signals across the isolation plane rather than light.
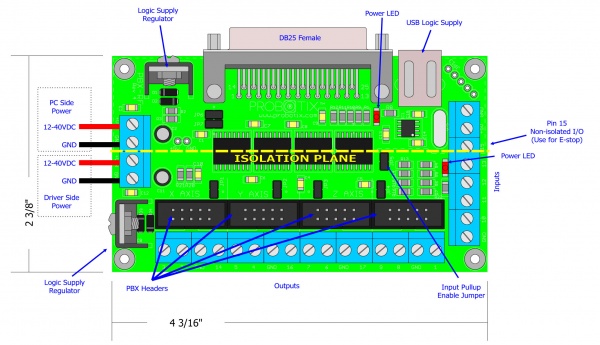
The PBX-RF breakout board splits the 17 available signals from the parallel port so that they can be accessed. It is functionally equivalent to the non-isolated version - the PBX-2. Twelve of the signals are available as outputs to control motors, relays, or other devices. The other 5 signals are configured as inputs. These inputs are typically used for limit and home switches, touch probes, and emergency stop interrupters. Pins are used as Outputs: 1,2,3,4,5,6,7,8,9,14,17 Inputs: 10,11,12,13,15.
The isolation chips require power supply on both sides of the isolation circuitry. The PC side can be supplied with any DC power supply from 12 to 40 volts capable of at least 100mA. The easiest way to drive this side of the board, however, is by connecting it to a USB connector of the host computer. The PCs USB ports can supply 5VDC at 100mA without needing to enumerate. Be sure to disconnect JP6 when using the USB supply.
The PBX-RF utilizes our standard PBX-Header IDC connectors for easily connecting to our drivers and other peripherals. See Figure 1 for the pinouts of the PBX-Header. The PBX-Header can supply logic side power to your driver boards. Some of our drivers also have on-board logic supply regulators. Use the jumpers JP1-4 to ensure that both regulator sections are not connected at the same time.
The driver side of the PBX-RF has a built in LM317 based voltage regulator section that will supply 1.5AMPS @ +5V to the driver outputs of this interface. The jumpers JP1-4 connect the 5V supply to pin 7 of the PBX-Header.The LM317 is rated for 40VDC, so you can connect it up to the same power supply as the motors in most cases. You may want to run it off of a WalWart to provide an additional layer of protection and to limit noise. Make sure to test the polarity of the wires from the WalWart, and make sure it is not an AC output device. Any voltage between 6 and 40 volts should work.
The +5VDC logic supply rail connects to the limit switch and e-stop inputs through a jumper connected 1K pull-up resistor network. The pullup resistors are needed in most cases when switching the logic inputs through physical switches. Disconnect JP5 if you do not need the pullups.
Although the PBX-RF is an isolated breakout board, we strongly recommend that you use an add-on parallel port card. Be aware that those $10 MOSCHIP NM9805 Chipset driven boards will initialize at non-standard addresses. The Windows XP drivers will not let you change the address. This is not a problem for LinuxCNC(EMC) or Mach3, but some CNC control software will not allow you to use a non-standard parallel port address
Diagram:
Schematic:
Software Configuration:
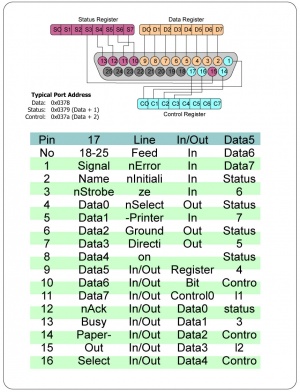
Most stepper motor drivers require a step signal and a direction signal. Some drivers also require an enable signal. When using the PBX-Headers, the pinouts for most setups will be will be configured as in Figure 3. When wiring your motors, you need not worry about the direction the motors will spin, because this can be reversed in the software configuration. Also, some drivers will step on a transition from low to high, other from high to low, but again, this can be configured in the software.
The Parallel Port was primarily designed for controlling printer devices, so on some pins the logic inside of the PC is inverted for different reasons. The best method to determine your exact settings is often trial and error. The built in parallel port on your PC generally shows up at address 0x378, but that is determined by your BIOS settings, and can be changed in most cases. Add-on parallel port cards are generally the same, but you may or may not be able to change the base address.
In Windows, you can find the parallel port address under Device Manager. In Linux, you can find it with the the following command: lspci -v.


