Difference between revisions of "LinuxCNC 2.9.2 on Debian 12"
From PROBOTIX :: wiki
(→Boot From USB Thumb Drive to Install Custom Debian 12) |
|||
| (26 intermediate revisions by the same user not shown) | |||
| Line 21: | Line 21: | ||
=== Boot From USB Thumb Drive to Install Custom Debian 12 === | === Boot From USB Thumb Drive to Install Custom Debian 12 === | ||
| − | # Insert USB Thumb Drive and boot from it. You may need to select the boot source. This varies by motherboard, but can include hitting <F12> or <F2> or <F10> to select boot media. | + | # Insert USB Thumb Drive and boot from it. You may need to select the boot source. This varies by motherboard, but can include hitting <F12> or <F2> or <F10> to select the USB boot media. |
| − | <gallery mode="packed-overlay"> | + | # The operating system install takes about 10 minutes. |
| + | # When the installer has finished it will reboot in the Debian 12 operating system. | ||
| + | |||
| + | <gallery mode="packed-overlay" widths="200px"> | ||
File: installer1.jpg | Step 1: Start Installer | File: installer1.jpg | Step 1: Start Installer | ||
File: installer2.jpg | Step 2; Wait For Installer To Finish | File: installer2.jpg | Step 2; Wait For Installer To Finish | ||
| + | File: installer3.jpg | Step 2; Reboots into Debian 12 | ||
</gallery> | </gallery> | ||
| − | + | ||
| + | <hr> | ||
=== Clone PROBOTIX Linux CNC Repository === | === Clone PROBOTIX Linux CNC Repository === | ||
| − | + | {{WarningBox|'''Note: '''Make sure Linux is connected to the internet either by ethernet or by wifi dongle.}} | |
| − | <gallery mode="packed-overlay"> | + | # Go to Place > Home Folder |
| − | File: | + | # Double-click on clone_linuxcnc.sh |
| − | File: | + | # Choose "Run in Terminal" |
| − | + | # Wait for LinuxCNC to be cloned locally | |
| − | File: | + | # A new folder 'linuxcnc' is created. Open that folder. |
| − | + | ||
| − | + | <gallery mode="packed-overlay" widths="200px"> | |
| − | + | File: installer4.jpg | Go to Places > Home Folder | |
| − | File: | + | File: installer5.jpg | Double-click clone_linuxcnc.sh |
| − | File: | + | File: installer6.jpg | Choose "Run in Terminal" |
| + | File: installer7.jpg | Wait for LinuxCNC to be cloned | ||
| + | File: installer8.jpg | Open 'linuxcnc' folder | ||
</gallery> | </gallery> | ||
| + | <hr> | ||
=== Update OS === | === Update OS === | ||
| − | # | + | # Open the 'setup' folder |
| + | # Double-click os_setup.sh | ||
| + | # Choose "Run in Terminal" again | ||
| + | # Wait for setup script to run. This will change some icons, set the desktop background, setup networking for the Mesa cards and several other things. | ||
| + | |||
| + | <gallery mode="packed-overlay" widths="200px"> | ||
| + | File: installer9.jpg | Open 'setup' folder | ||
| + | File: installer10.jpg | Double-click os_setup.sh | ||
| + | File: installer11.jpg | Choose "Run in Terminal" | ||
| + | File: installer12.jpg | Wait for setup script to run | ||
| + | </gallery> | ||
| + | |||
| + | <hr> | ||
=== Update AXIS === | === Update AXIS === | ||
Latest revision as of 09:27, 20 June 2024
Note: Requires 64 Bit Processor.
Before starting you will need:
- 8GB (or larger) FAT32 formatted USB drive
- Download the LinuxCNC iso image file: http://www.probotix.com/linuxcnc/PROBOTIX-LinuxCNC_2.9.2.iso
- Download Win32DiskImager: http://www.probotix.com/linuxcnc/win32diskimager-1.0.0-install.exe
Contents
Create the Bootable USB Drive
Burn Image To USB Thumb Drive
- step 1
- step 2
Install Operating System
Note: Make sure your BIOS clock is set properly before starting the re-install. It may also be a good idea to replace the BIOS battery before setting the clock.
Boot From USB Thumb Drive to Install Custom Debian 12
- Insert USB Thumb Drive and boot from it. You may need to select the boot source. This varies by motherboard, but can include hitting <F12> or <F2> or <F10> to select the USB boot media.
- The operating system install takes about 10 minutes.
- When the installer has finished it will reboot in the Debian 12 operating system.
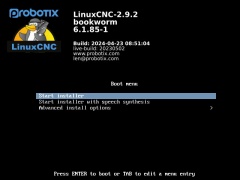
Step 1: Start Installer
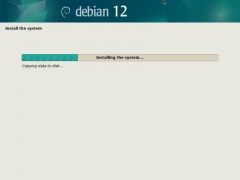
Step 2; Wait For Installer To Finish
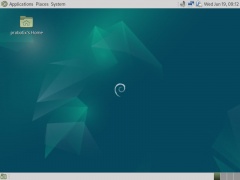
Step 2; Reboots into Debian 12


Clone PROBOTIX Linux CNC Repository
Note: Make sure Linux is connected to the internet either by ethernet or by wifi dongle.
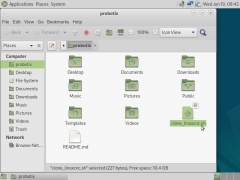
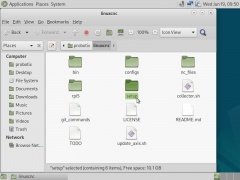
- Go to Place > Home Folder
- Double-click on clone_linuxcnc.sh
- Choose "Run in Terminal"
- Wait for LinuxCNC to be cloned locally
- A new folder 'linuxcnc' is created. Open that folder.
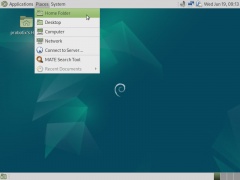
Go to Places > Home Folder
Double-click clone_linuxcnc.sh
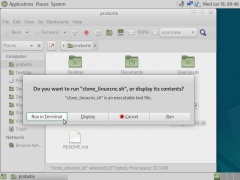
Choose "Run in Terminal"
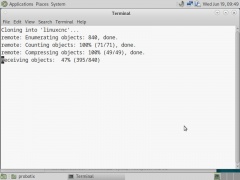
Wait for LinuxCNC to be cloned
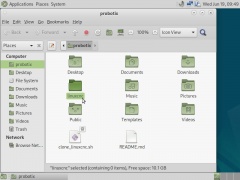
Open 'linuxcnc' folder


Update OS
- Open the 'setup' folder
- Double-click os_setup.sh
- Choose "Run in Terminal" again
- Wait for setup script to run. This will change some icons, set the desktop background, setup networking for the Mesa cards and several other things.
Open 'setup' folder
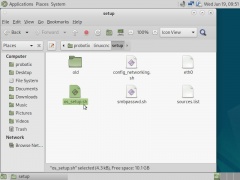
Double-click os_setup.sh
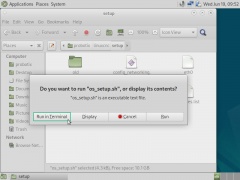
Choose "Run in Terminal"
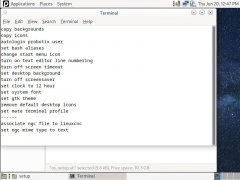
Wait for setup script to run


Update AXIS
- /home/probotix/linuxcnc/update_axis.sh
Edit Configuration
Edit ini File
- /home/probotix/linuxcnc/configs/PROBOTIX/[machine_model].ini
LinuxCNC First Launch
Launch Configuration Chooser
- Applications > Accessories > LinuxCNC
- Choose Machine Version