Difference between revisions of "VFDs"
From PROBOTIX :: wiki
m (→Setting needed for galaxy series machines:: added leading zeros) |
|||
| (14 intermediate revisions by the same user not shown) | |||
| Line 1: | Line 1: | ||
| − | [[File:VFD_wiring_diagram.jpg|thumb|400px | + | [[Category:Spindles]] |
| − | + | ||
| + | == Huangyang VFD == | ||
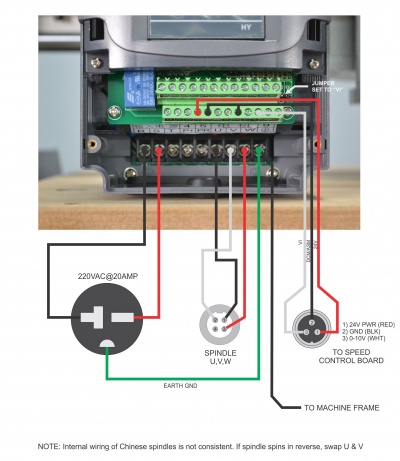
| + | [[File:VFD_wiring_diagram.jpg|thumb|400px|alt=Huanyang VFD Wiring|Huanyang VFD Wiring Diagram]] | ||
[[Media:Huanyang_SL_Series_Manual.pdf | Huanyang VFD Manual]] | [[Media:Huanyang_SL_Series_Manual.pdf | Huanyang VFD Manual]] | ||
===To change settings:=== | ===To change settings:=== | ||
| − | + | # Press [PROGRAM] | |
| − | + | # Use arrow keys to change to program number your looking to change | |
| − | + | # Press [SET] | |
| − | + | # Use the arrow keys to change the value to appropriate value | |
| − | + | # Press [SET] to save the value | |
| − | + | ||
===Setting needed for galaxy series machines:=== | ===Setting needed for galaxy series machines:=== | ||
| − | + | * PD001 – Source of Run Command – 0 | |
| − | + | * PD002 – Source of Operating Frequency – 1 | |
| − | + | * PD014 - Acceleration - 3 | |
| − | + | * PD070 – Analog Input 0-10V – 0 | |
| − | + | * PD144 – Rated Motor Revolution – 3000 | |
| − | + | ||
===Displaying RPM instead of Hz:=== | ===Displaying RPM instead of Hz:=== | ||
| − | |||
Press the arrow over key until the Rott light is illuminated | Press the arrow over key until the Rott light is illuminated | ||
| + | == Sunfar E300 VFD == | ||
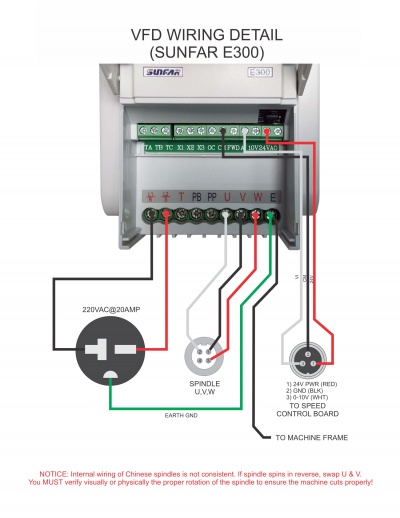
| + | [[File:VFD_Sunfar_E300.jpg|thumb|400px|alt=Sunfar E300 VFD Wiring|Sunfar E300 VFD Wiring Diagram]] | ||
| + | [[Media:Sunfar_VFD.pdf | Sunfar E300 VFD Manual]] | ||
| + | ===To change settings:=== | ||
| + | # Press [SET] | ||
| + | # Use arrow keys to change to program number your looking to change | ||
| + | # Press [SET] | ||
| + | # Use the arrow keys to change the value to appropriate value | ||
| + | # Press [SET] to save the value | ||
| + | # Press [ESC] to exit programming mode | ||
| + | ===Setting needed for galaxy series machines:=== | ||
| + | * F0.00 = 1 (for 0-10V Control) or 3 (for knob control) | ||
| + | * F0.02 = 1000 (for panel [RUN] button) | ||
| + | * F0.04= 400 (Spindle Frequency) | ||
| + | * F0.05 = 5.0 (Acceleration time) | ||
| + | * F0.12 = 400 (Basic Frequency) | ||
| + | * F0.13 = 220 (Volts) | ||
| + | * F1.03 = 400 (Max Frequency) | ||
| + | * F1.07=1 | ||
| + | * F1.08=2 | ||
| + | * F1.09=3 | ||
| + | == Sunfar E500 VFD == | ||
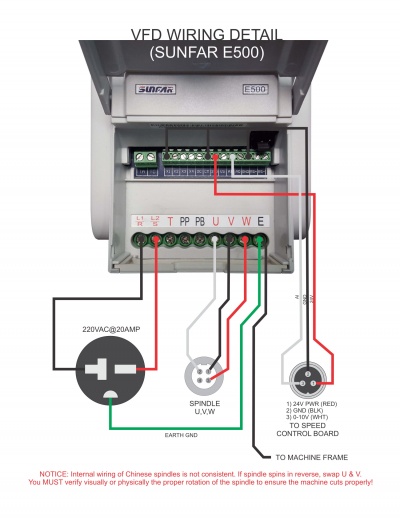
| + | [[File:VFD_Sunfar_E500.jpg|thumb|400px|alt=Sunfar E500 VFD Wiring|Sunfar E500 VFD Wiring Diagram]] | ||
| + | [[Media:SunfarE500.pdf | Sunfar E500 VFD Manual]] | ||
| + | ===To change settings:=== | ||
| + | # Press [SET] | ||
| + | # Use arrow keys to change to program number your looking to change | ||
| + | # Press [SET] | ||
| + | # Use the arrow keys to change the value to appropriate value | ||
| + | # Press [SET] to save the value | ||
| + | # Press [ESC] to exit programming mode | ||
| − | + | ===Setting needed for galaxy series machines:=== | |
| − | + | * F0.00 = 1 (for 0-10V Control) or 3 (for knob control) | |
| − | + | * F0.02 = 1001 (for panel [RUN] button) | |
| − | + | * F0.04= 400 (Spindle Frequency) | |
| − | + | * F0.05 = 5.0 (Acceleration time) | |
| − | + | * F0.11 = 0 (Torque Boost) | |
| − | + | * F0.12 = 400 (Basic Frequency) | |
| − | + | * F0.13 = 220 (Volts) | |
| − | + | * F1.00 = 0.4 (AI Lower Limit) | |
| − | + | * F1.01 = 10 (AI Upper Limit) | |
| + | * F1.03 = 0 (Min Freq) | ||
| + | * F1.04 = 400 (Max Freq) | ||
| + | * F1.08 = 11 (Terminal 1 Function) | ||
Latest revision as of 15:18, 18 January 2019
Contents
[hide]Huangyang VFD
To change settings:
- Press [PROGRAM]
- Use arrow keys to change to program number your looking to change
- Press [SET]
- Use the arrow keys to change the value to appropriate value
- Press [SET] to save the value
Setting needed for galaxy series machines:
- PD001 – Source of Run Command – 0
- PD002 – Source of Operating Frequency – 1
- PD014 - Acceleration - 3
- PD070 – Analog Input 0-10V – 0
- PD144 – Rated Motor Revolution – 3000
Displaying RPM instead of Hz:
Press the arrow over key until the Rott light is illuminated
Sunfar E300 VFD
To change settings:
- Press [SET]
- Use arrow keys to change to program number your looking to change
- Press [SET]
- Use the arrow keys to change the value to appropriate value
- Press [SET] to save the value
- Press [ESC] to exit programming mode
Setting needed for galaxy series machines:
- F0.00 = 1 (for 0-10V Control) or 3 (for knob control)
- F0.02 = 1000 (for panel [RUN] button)
- F0.04= 400 (Spindle Frequency)
- F0.05 = 5.0 (Acceleration time)
- F0.12 = 400 (Basic Frequency)
- F0.13 = 220 (Volts)
- F1.03 = 400 (Max Frequency)
- F1.07=1
- F1.08=2
- F1.09=3
Sunfar E500 VFD
To change settings:
- Press [SET]
- Use arrow keys to change to program number your looking to change
- Press [SET]
- Use the arrow keys to change the value to appropriate value
- Press [SET] to save the value
- Press [ESC] to exit programming mode
Setting needed for galaxy series machines:
- F0.00 = 1 (for 0-10V Control) or 3 (for knob control)
- F0.02 = 1001 (for panel [RUN] button)
- F0.04= 400 (Spindle Frequency)
- F0.05 = 5.0 (Acceleration time)
- F0.11 = 0 (Torque Boost)
- F0.12 = 400 (Basic Frequency)
- F0.13 = 220 (Volts)
- F1.00 = 0.4 (AI Lower Limit)
- F1.01 = 10 (AI Upper Limit)
- F1.03 = 0 (Min Freq)
- F1.04 = 400 (Max Freq)
- F1.08 = 11 (Terminal 1 Function)


